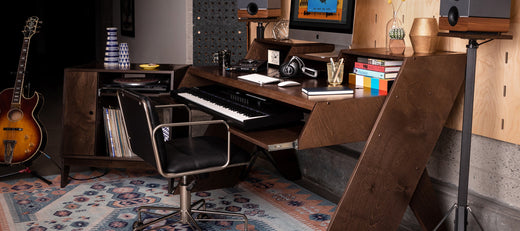
We’ve delved into why time alignment matters, common pro studio attributes, and general best practices where you to place acoustic treatment, but we recently realized that we neglected to go into one of the most important decisions you’ll make when setting up your studio, and that’s where you put your studio monitors and how you arrange your room. No amount of acoustic treatment or room correcting algorithms can make up for completely messing this part up, so sorry it took this long, but here is us making amends.
In general, our ethos is to prioritize functionality over acoustic purity, because, for example, if acoustic purity requires putting a desk in front of the only door to get into the room, it’s going to make using the room difficult. When things aren’t purpose built, compromise is often just part of the deal. However, educated compromises can help mitigate them. Rearranging a room can be a pain in the backside (or if you’re my age, literally your back), but a few moments of discomfort is probably worth it if your mixes immediately improve due to the accuracy of your monitors.
Here are the lucky seven best practices in studio monitor placement.
1. Use The Short Wall
If your room is a perfect square, and may the gods of the Axial Modes help you if it is (you’ll really need bass traps), this doesn’t apply to you. For the rest of us with rectangular rooms, this means putting your studio desk and monitors on the short wall of the room, firing into the longer dimension. This will help mitigate the smearing of early reflections (also known as first reflections), and if using treatment to knock those down, aid in their effectiveness.

Early reflections are the first reflections you’ll hear after the sound directly from your studio monitors. Basically, in the world of bouncy balls, if someone throws two balls at you at the same time, the one thrown directly at you will be from the source, and the one that bounces once and arrives a split second later from the direction of the bounce is the early reflection. These will generally smear your soundstage and while your brain won’t interpret the tiny delay, well, as delay, it will interpret it as distortion. If your back wall is closer to you than your side walls and early reflections are coming from behind you instead of beside you, it will make that distortion that much worse. You really want to avoid this.
There’s a reason nearly every concert hall and cinema on planet earth is longer than it is wide.
2. Symmetry Is Your Friend
Not only do you want your mix setup on the short wall, you want it centered on the short wall, with your studio monitors equidistant from the walls to your left and right. This is due to those pesky early reflections. You want them reaching your ears at the same time. Even if you’ve treated your early reflections, there’s still going to be remnants of them.
This symmetry also applies to your head and the monitors. Ideally you want your mix position to be in an equilateral triangle with your studio monitors. We designed the dimensions of Platform with this specifically in mind.

Lastly, there is a caveat to this symmetry, you do not want the distance of your monitors from the back wall to the side wall to be the same. Put another way, if your monitors are 12” from the back wall, you do not want them also 12” from the side wall. This will create all kinds of reinforcement and phasing issues. We've seen some folks in HiFi circles recommend this because it can enhance bass response, which is specifically why we suggest you do not do this. If your intention is to pound away, go for it. However, if your intention is accuracy in mixing, don't do it.
3. Consistency in Early Reflective Materials
This is similar to point 2 and symmetry, but upping the ante a bit. This can also be the most difficult to accomplish. Basically, you want the materials that will be reflecting first to be the same type of materials. If your left early reflection is drywall, you don’t want the right side to be a window. Different materials have very different reflective properties. Glass reflects high frequencies much greater than drywall. Brick reflects differently than drywall. If you treat one side, you better treat the other. If your early reflections don’t match each other in both the timing of arrival but also frequency response, it’s pretty obvious that it’s going to distort your soundstage.
4. Height Matters
If your monitors are time aligned, this is going to be easy. If not, good luck, because dispersion is going to be inconsistent (we'll happily sell you some that are). However, if they are, get the tweeters at ear height. High frequencies are much more directional than lower, so having these firing on the same plane as your ears is critical. This is why our Stands are adjustable.
If you are placing your monitors on the bridge of your desk, the investment in adjustable iso stands to get them to the proper height is definitely worth it.

5. Not Against the Wall
You really do not want your studio monitors up against the wall behind them. However, there are obvious practical limitations to this rule, which is why a lot of studio monitors have ‘Acoustic Space’ or similar switches, that are basically just rolloffs.
Ideally, you want to follow the ⅓ rule, which basically means your monitors should be ⅓ the distance from the wall behind them as your room is long, so if 12 feet long, 4 feet from the wall. Now we admit that this is wildly impractical, so the first compromise distance is the ⅕ rule, so in that 12 ft. room about 2.5 ft. from the wall. Now in the real world, just try to make sure they’re as far away from the wall behind you as possible. This will affect the low end of your monitors, but this is also one of those things you can probably translate for when you’ve learned your room while mixing, because the reinforcement will be consistent if you mix at consistent levels (which you should). It’s a bit different than all the early reflective issues.
6. Keep Line of Sight (err… audio) Clear
Basically, don’t put anything super reflective between you and your studio monitors. Sometimes I see nearfield studio monitors placed behind a studio desk where it’s pretty obvious the bridge of the desk is going to reflect whatever is coming from the monitors. Don’t do that.
Sometimes you have to have tall gear on your desk, but try your best to not have it too much in the way where it will color the sound of your monitors.
7. Get Treatment
Okay, this last one isn’t really about placement, but your studio monitors will sound better if you not only arrange your room to be the least compromised acoustically, but treat your room to mitigate the issues inherent in the cubes we live in.
Conclusions
We're here to help if you have any questions about where to put your monitors, or treatment options.


